Friday, February 3, 2017

STEM in First - Marble Mazes

I planned this STEM activity based on the random supplies I had in my classroom (paper plates and straws). By planned I mean I typed into Google "paper plates + straws + stem" at 3PM in my classroom with my purse on my shoulder and one foot out the door. 

I found this post and loved the idea of a marble maze challenge and knew straws would make perfect "lanes". I borrowed some marbles from my school's STEM coach and we were ready to go the next morning. It turned out to be the best STEM activity I've ever done with a class! They were excited and totality engaged. From design, construction, trial/error, and a post-discussion, they were completely into it.

First, I showed them this video. It was kid friendly and a great example for them. We talked about how the maze in the video has a starting point and an ending point but also some tricks in between - the dead ends. We also noticed how the marble needs to be able to fit through the "lanes".
Get this freebie planning sheet here.

They did an awesome job designing their mazes on their planning sheets and when it came time to finally build they couldn't wait. They sketched their plans onto their plates, cut and then taped the straws to create their very own game.


A little bit into our construction, I passed out some sheets of foil and they added tunnels to their mazes and some even created little walls. They really impressed me with their thinking!

Once our time was up we played with each other's mazes and gave suggestions and compliments to each other on our designs. I plan on leaving them in our classroom as a game the kids can enjoy throughout the year.


It felt like they had a lot of great opportunities to talk to each other, really work with each other, and make something successfully that they really thought was cool. And they got to play! 

Grab the free planning sheet HERE.

Thursday, January 19, 2017

Organizing Reading and Math Rotations with PowerPoint

Hi! I wanted to share some info on a timed slideshow I use in my classroom to organize my reading and math groups. In previous years I have used either a pocket chart with cards, a clip chart, or a projected pdf file to show my students where they go during their centers. All worked fine but I wanted a way to control my rotations without having to really do much of anything - ie move the clips daily, ding a bell, set a timer. Doesn't sounds like much but you know how it goes when you have 16 kids moving around the room! You need to have your hands and eyes free. And really... I just wanted my rotations to run themselves. With this slideshow that's exactly what they do.

I can set the slides to any amount of time I want. It's really simple. Here's how I do it:

Open up the presentation and click on "Transitions". You'll see a option to change the timing all the way to the right on the screen. You can change the minutes you want each slide to last by editing the first two numbers. Click on the box next to "After" to make sure your slideshow runs itself (If you select "On Mouse Click" the slide will not change by itself after the allotted time.)

(Click the images to enlarge if needed)

You can also change the sound the slide makes when it switches and the duration of the sound. Select the drop down box labeled "Sound". Preview your slideshow to hear the sound.


That's really all it takes to create a unique center rotation slideshow that fits the needs of your classroom!

You can find these editable rotation boards in my store. You can add your own clipart or use the already designed board. I tried to use clipart that was generic to math and reading but designed an option that allows you to add your own clipart or copy and paste images. There are board options for rotations of 3, 4, or 5 groups.

Check out the Colorful Chalkboard rotation boards *HERE* and the Teal and Grey rotation boards *HERE


Saturday, January 7, 2017

Nonfiction in First: The Arctic


Before winter break began, my first graders finished up their nonfiction unit. We reviewed the differences between fiction and nonfiction, learned a few text features and how they can give us information, and we learned lots of interesting facts about the Arctic and its animals.

We also learned about igloos! We labeled the parts of an igloo after reading an article and watching a few videos about how they are constructed and then we built our own. We did this activity at our Polar Party and it was their favorite!


No party is complete without dessert!
I got all the supplies at the dollar store: frosting, Styrofoam cups, paper plates, pop sticks for applying frosting, and mini marshmallows. Here's where I got the idea.

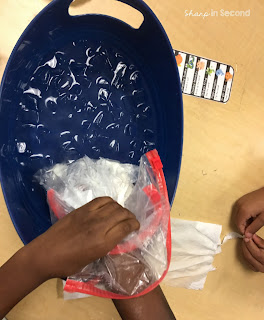
Another activity  I would recommend if you are learning about Arctic animals is this blubber simulation experiment. All you need is some Crisco, baggies, and ice water in a bucket. I've seen this idea many different times online and I am not sure where it originated but it's awesome. It's a really fun way to drive home some arctic vocab words like INSULATE and BLUBBER too ☺

The kids loved learning about Polar Bears so at our Polar Party we also created some multimedia Polar Bear art.

If you're studying the Arctic following my Pinterest board for some fun ideas.


We also did this adorable activity after reading Sneezy The Snowman. This free download is by Loving Teaching Inspiring. Thank you for the awesome idea and book recommendation!

Mix up some glue and shaving cream (I just eyed it) and add your snowman parts. I  googled "snowman parts printable" and found this resource for all the cute snowman accessories.

Our next unit is all about fictional characters and building reading fluency. I look forward to doing some Readers Theater and reading LOTS of Mo Willems!

Back to school on Monday. Time to go make the most of my final weekend of freedom.